
- A+
Introduction
As a professional and high-quality printer, Epson 7800 is widely used in various industries, such as photography, advertising, and art. However, over time, the printer's waste ink container will gradually fill up, which will cause error messages and poor printing quality. Therefore, it is essential to regularly clean the waste ink tank. This article will introduce how to reset or clear the waste ink container of Epson 7800.
Why Clear Epson 7800 Waste Ink Container?
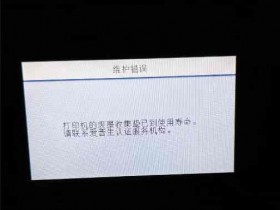
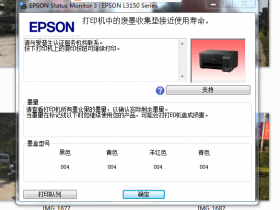
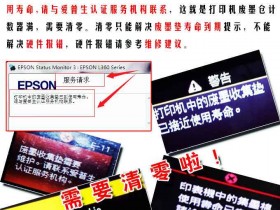
Before introducing the steps of clearing the Epson 7800 waste ink container, let's take a closer look at why it is so important to do so. When the printer runs, a small amount of ink will be used to maintain the print head's temperature and prevent it from drying out. However, the remaining ink in the print head will be transferred to the waste ink container through the waste ink tube, which is located at the bottom of the printer. If the waste ink container is not cleaned for a long time, it will eventually be filled, which will cause the printer to stop working. In addition, the filling of the waste ink tank will cause ink to overflow, which will result in poor printing quality and damage to the printer.
Steps to Clear Epson 7800 Waste Ink Container
Now, let's take a closer look at the steps to clear the Epson 7800 waste ink container.
Step 1: Put on Gloves and Turn off the Printer
Before clearing the waste ink container, it is essential to put on gloves to prevent ink from getting your hands and clothes dirty. Then, turn off the printer by using the power button located on the front panel.
Step 2: Open the Printer Cover
Press the cover open button, which is also located on the front panel, to open the printer cover.
Step 3: Locate and Remove the Waste Ink Tube
The waste ink tube is located on the right side of the printer. Use a screwdriver to loosen the screw that holds the tube in place, and gently remove the tube from the printer.
Step 4: Drain and Clean the Waste Ink Container
After removing the waste ink tube, the waste ink container can be removed from the printer's back. Use a funnel to drain the waste ink into a container and then clean the waste ink container with water. Dry it thoroughly before reinstalling it into the printer.
Step 5: Reinstall the Waste Ink Tube
Once the waste ink container has been cleaned and reinstalled, reconnect the waste ink tube to the bottom of the container. Use a screwdriver to tighten the screw and ensure that the tube is firmly in place.
Step 6: Reset the Waste Ink Counter
Finally, it is necessary to reset the waste ink counter. Epson has built a safety feature into the printer that will stop it from functioning when the waste ink tank is full. To reset the counter, install a waste ink reset utility on your computer, connect the printer to your computer, and follow the instructions provided in the software.
Conclusion
Clearing the waste ink container of Epson 7800 is a necessary maintenance operation. With regular cleaning, the printer can maintain its excellent printing quality and extend its service life. The process of clearing the waste ink container is not complicated, but it requires carefulness and patience. With the steps and precautions introduced in this article, users can easily and safely clear the waste ink container and reset the counter of their Epson 7800 printers.